RTA Guide/Bowser in the Dark World: Difference between revisions
Jump to navigation
Jump to search
RetroTorpedo (talk | contribs) |
Moabmauler (talk | contribs) |
||
| (16 intermediate revisions by 5 users not shown) | |||
| Line 2: | Line 2: | ||
|title= Bowser in the Dark World | |title= Bowser in the Dark World | ||
|image= BitDW.png | |image= BitDW.png | ||
|rta_record=[https:// | |rta_record=[https://twitter.com/cjrokokomero/status/1685846976292614144 26.23 (Course)] / [https://youtu.be/Hd7xNsur2go 42.43 (with Red Coins)] | ||
|ss_record=[https://www.youtube.com/watch?v=b_PGLyUmCeU 23.80 (IGT) (Course)] / [https://www.youtube.com/watch?v=3iPxTs7LkI4 41.74 (with Red Coins)] | |ss_record=[https://www.youtube.com/watch?v=b_PGLyUmCeU 23.80 (IGT) (Course)] / [https://www.youtube.com/watch?v=3iPxTs7LkI4 41.74 (with Red Coins)] | ||
|throw_record=[https:// | |throw_record=[https://youtu.be/H48zzXkMdfo 24.82] | ||
}} | }} | ||
:''For the battle with Bowser at the end of this stage, see the [[RTA Guide/Bowser Battles#Bowser in the Dark_World|Bowser Battles]] page.'' | |||
'''Bowser in the Dark World''' is located above [[RTA Guide/Cool, Cool Mountain|Cool, Cool Mountain]] in the lobby. 8 stars are needed to access it without the use of a [[RTA Guide/Lobby Backwards Long Jump|lobby BLJ]]. | '''Bowser in the Dark World''' is located above [[RTA Guide/Cool, Cool Mountain|Cool, Cool Mountain]] in the lobby. 8 stars are needed to access it without the use of a [[RTA Guide/Lobby Backwards Long Jump|lobby BLJ]]. | ||
== No Reds == | == No Reds == | ||
=== Beginner=== | |||
=== Beginner === | {{#ev:youtube|58zy0BEPApI}} | ||
===Intermediate=== | |||
=== Intermediate === | |||
{{#ev:youtube|x1w94wbR18g}} | {{#ev:youtube|x1w94wbR18g}} | ||
=== | ===Advanced=== | ||
{{#ev:youtube|RD2ckqS5BZU}} | {{#ev:youtube|RD2ckqS5BZU}} | ||
== Red Coin Star == | ===Other resources=== | ||
=== Beginner === | [https://youtu.be/PQfoNba4Ggo Framewalk strat tutorial] | ||
{{#ev:youtube|Aq4KlqAg-mQ}} | ==Red Coin Star== | ||
=== Intermediate (Shigeru Cycle)=== | ===Beginner=== | ||
{{#ev:youtube|https://www.youtube.com/watch?v=Aq4KlqAg-mQ}} | |||
===Intermediate (Shigeru Cycle)=== | |||
{{#ev:youtube|u06FFVGVpAo}} | {{#ev:youtube|u06FFVGVpAo}} | ||
{{#ev:youtube|7ChedJb_ZUc}} | {{#ev:youtube|7ChedJb_ZUc}} | ||
{{#ev:youtube|xFtyxqUE2gY}} | {{#ev:youtube|xFtyxqUE2gY}} | ||
=== Advanced (Xiah Cycle) === | |||
==== Xiah Cycle (no box rollout) ==== | <div><ul> | ||
<li style="display: inline-block; vertical-align: top;"> | |||
[[File:Dwcam.mov|thumb| Camera setup that makes the longjump after the 6th red notched upright. |class=autoplay]] | |||
</li> | |||
===Advanced (Xiah Cycle)=== | |||
====Xiah Cycle (no box rollout)==== | |||
{{#ev:youtube|H8o76YvlCB0}} | {{#ev:youtube|H8o76YvlCB0}} | ||
==== Xiah Cycle (box rollout) ==== | ====Xiah Cycle (box rollout)==== | ||
{{#ev:youtube|khXrpzAjM6Q}} | {{#ev:youtube|khXrpzAjM6Q}} | ||
=== Expert (Tsukishima Cycle) === | ===Expert (Tsukishima Cycle)=== | ||
==== Tsukishima Cycle ==== | ====Tsukishima Cycle==== | ||
{{#ev:youtube| | {{#ev:youtube|B-BdWGRJkbo}} | ||
==== Box Rollout Tutorial ==== | ====Box Rollout Tutorial==== | ||
{{#ev:youtube|8K4zwMIBC_I}} | {{#ev:youtube|8K4zwMIBC_I}} | ||
==== Alternative 7th Red Movement ==== | ====Alternative 7th Red Movement==== | ||
{{#ev:youtube|xrmZYzGyHLo}} | {{#ev:youtube|xrmZYzGyHLo}} | ||
=== Backups === | ===Backups=== | ||
<li style="display: inline-block; vertical-align: top;"> | <li style="display: inline-block; vertical-align: top;"> | ||
[[File:Dw burn.mp4|thumb| Burned by flame ([https://youtu.be/1IxN-vAFPQY example w/ inputs]) |class=autoplay]] | [[File:Dw burn.mp4|thumb| Burned by flame ([https://youtu.be/1IxN-vAFPQY example w/ inputs]) |class=autoplay]] | ||
| Line 47: | Line 54: | ||
[[File:Dw miss tj over.mp4|thumb| Alternate movement for missed switch ([https://youtu.be/1IxN-vAFPQY?t=46 example w/ inputs]) |class=autoplay]] | [[File:Dw miss tj over.mp4|thumb| Alternate movement for missed switch ([https://youtu.be/1IxN-vAFPQY?t=46 example w/ inputs]) |class=autoplay]] | ||
</li> | </li> | ||
=== Comparisons === | ===Comparisons=== | ||
{{#ev:youtube|gGRE40DOhoA}} | {{#ev:youtube|gGRE40DOhoA}} | ||
{{#ev:youtube|mJPNWImx_KM}} | {{#ev:youtube|mJPNWImx_KM}} | ||
== Castle Movement == | ==Castle Movement== | ||
<div><ul> | <div><ul> | ||
<li style="display: inline-block; vertical-align: top;"> [[File:CCM to DW.mp4|thumb| CCM to Darkworld movement) |class=autoplay]]</li> | <li style="display: inline-block; vertical-align: top;"> [[File:CCM to DW.mp4|thumb| CCM to Darkworld movement) |class=autoplay]]</li> | ||
<li style="display: inline-block; vertical-align: top;"> [[File:DW to Basement.mp4|thumb| To avoid ledge grabbing while going down the basement doors, punch before going over the ledge) |class=autoplay]]</li> | <li style="display: inline-block; vertical-align: top;"> [[File:DW to Basement.mp4|thumb| To avoid ledge grabbing while going down the basement doors, punch before going over the ledge) |class=autoplay]]</li> | ||
</ul></div> | </ul></div> | ||
Latest revision as of 01:52, 23 August 2025
| Bowser in the Dark World | |

| |
| Record Information | |
| RTA World Record | 26.23 (Course) / 42.43 (with Red Coins) |
| Single Star World Record | 23.80 (IGT) (Course) / 41.74 (with Red Coins) |
| Bowser Throw World Record | 24.82 |
- For the battle with Bowser at the end of this stage, see the Bowser Battles page.
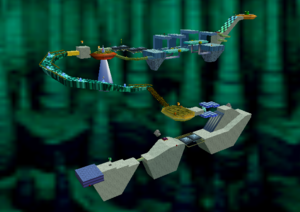
Bowser in the Dark World is located above Cool, Cool Mountain in the lobby. 8 stars are needed to access it without the use of a lobby BLJ.
No Reds
Beginner
Intermediate
Advanced
Other resources
Red Coin Star
Beginner
Intermediate (Shigeru Cycle)
-
Burned by flame (example w/ inputs)
-
Missed switch (example w/ inputs)
-
Alternate movement for missed switch (example w/ inputs)
Advanced (Xiah Cycle)
Xiah Cycle (no box rollout)
Xiah Cycle (box rollout)
Expert (Tsukishima Cycle)
Tsukishima Cycle
Box Rollout Tutorial
Alternative 7th Red Movement
Backups
Comparisons
Castle Movement
| |||||||||||||||||||||||||||||||||||||||||||||||||||||||||||||||||